URLs, Routes and React Router
Understanding how to use URLs and how to create routes in React

I have been a full-stack developer for twelve years and am currently part of the Cloud FinOps team at Atlassian. I previously ran an App development agency, managing various teams across design and development, leading web, backend and native mobile app developers in Australia and Europe. My strengths are system architecture design and communicating complicated tech to everyday people. Having helped scale tech at numerous startups, I am passionate about making a positive difference. When not working, you can find me writing tech articles and teaching Javascript and React at SheCodes, an initiative helping to get more women into tech. I regularly give talks on various topics, focusing on the impact the technology we build can have. I am devastated by the state of the world, love a good political rant and can often be swearing at no one in particular. I enjoy building things in JavaScript, Deno and Node.
Disclaimer: I created this blog and content to help my 2022 SheCodes Australia Plus cohort understand the basics of URLs and React Router
Update Feb 2023: Updated for my 2023 cohort
You click a link, a button or a navigation element, something loads and the page changes. How do we set this up in React? What's going on under the hood to make the page change? When using React with Create React App, the easiest way to set up routes is to use React Router. Before we take a closer look at React Router, let's look at a URL and go over its makeup and how it works.
Here is an example URL:
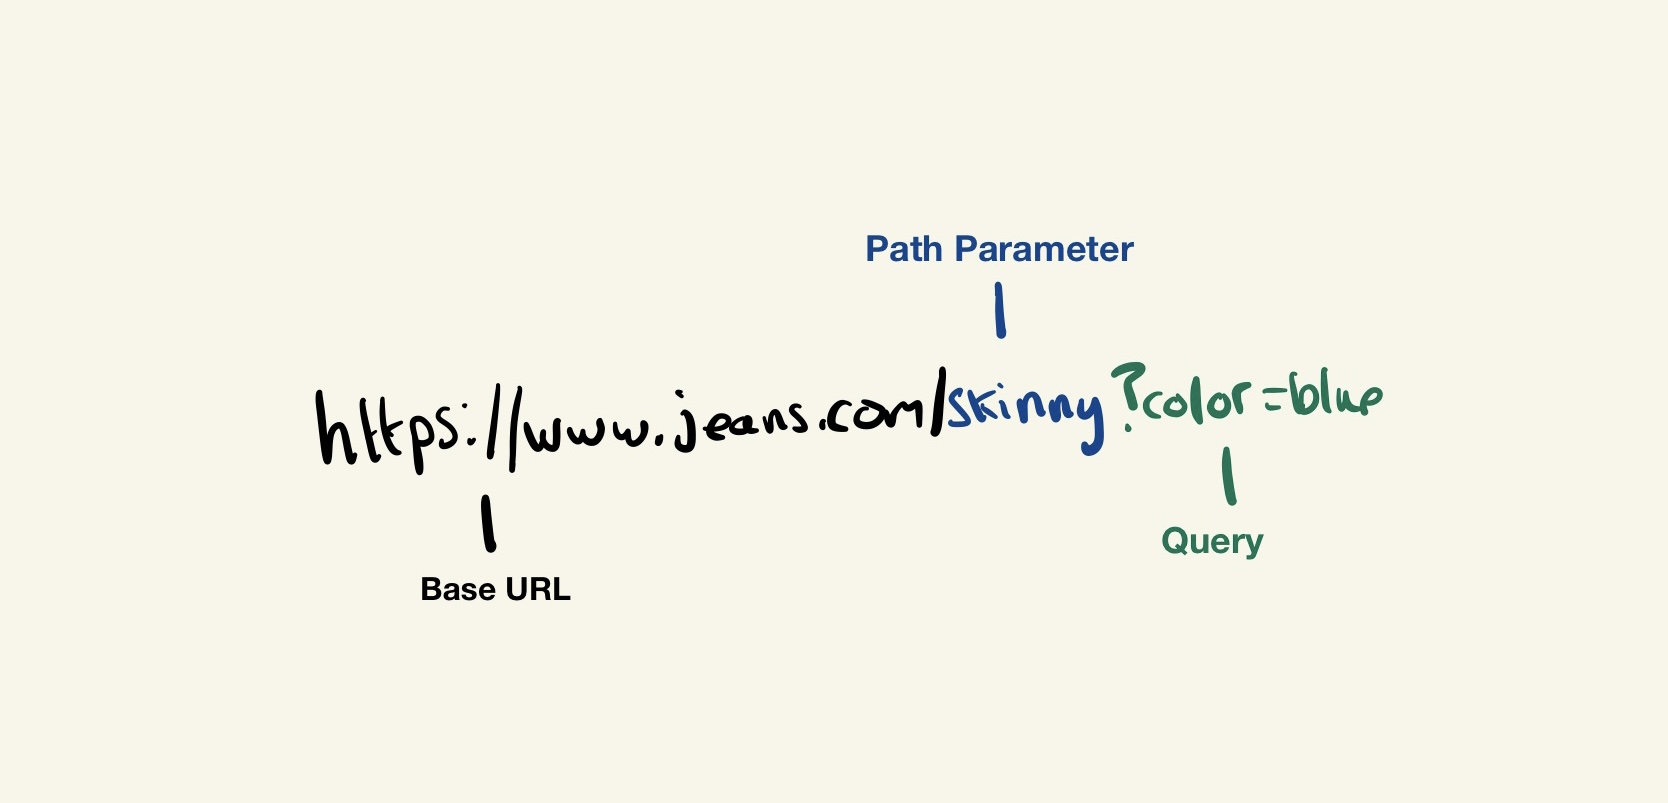
www.jeans.com is the base URL referred to as the domain or origin. It is the address of the website. It tells web traffic which server to point to, the one with the code/content for www.jeans.com when someone types it in their browser.
/skinny personally, my favourite type of jeans is a path parameter or param. Different path parameters typically control the load of pages or drastically change the page's contents. /skinny is a good example here. I am on a website that sells jeans. I clicked the type I wanted, and the website directed me to a new page in my browser that shows all the different styles and colours of skinny jeans.
color=blue is called a query or sometimes called a query param. A query slightly alters what you see on the page. In this jeans example, we have a brand, colour and size filter on the page. Setting the colour to blue adds the query at the end of the URL and filters the jeans I see on the page.
React Router and Client Side Rendering
Usually, when you click a link to a new page in an app, for example, going from home to contact, your browser makes another request to the server. If your browser could talk, it would say to the server. "I have the HTML and files for the home page. Can I now have the HTML and files for the contact page".
However, when we use tools like Create React App or Vite React template, we send JavaScript for the whole app to the browser and create a single-page app. That means we are loading one app and one page under the hood, but we use tools like React Router to make the URL and app behave like the example I gave before. Another way of thinking about it is the URL is the state, just like the useState hook inside React. Your UI should interact and change based on what is in the URL.
Example app
The best way to understand new concepts is to build something. Let's spin up a small app using my jeans concept. First, set up a new project with Vite using the following command in the terminal. npm create vite@latest routes-and-jeans -- --template react.
Wait for it to set up the project, and cd into the folder using cd routes-and-jeans. Next, let's install React Router to use it in our project npm install react-router-dom. Once installed, let's run the app to ensure everything is working by typing in npm run dev.
Set up
To create routes (pages) in our app, we need to create a browser router. Head to the main.jsx file inside the src folder and set up our router.
import React from "react";
import ReactDOM from "react-dom/client";
import { createBrowserRouter, RouterProvider } from "react-router-dom";

// Components
import App from "./App";

// CSS
import "./index.css";

const router = createBrowserRouter([
  {
    path: "/",
    element: App,
  },
]);

ReactDOM.createRoot(document.getElementById("root")).render(
  <React.StrictMode>
    <RouterProvider router={router} />
  </React.StrictMode>
);
Setting up a Browser Router means we can set up the main routes in our main.jsx file and create nested routes anywhere in our app. We will also be able to access the URL, browsing history of our site, path params and queries in all components inside the router.
Next, let's create three new pages to use in our app. I will make a folder called pages inside the src folder. Inside my new folder, called pages, I will create three new folders named HomePage, JeansPage, and ContactPage. Inside each folder, create a index.jsx file and add the following code:
function HomePage() {
  return <h1>I am the home page</h1>;
}

export default HomePage;
Make sure you update the name in the code to match the folder you put it in. For example, when adding it to the ContactPage index file, change the component name to ContactPage and update the heading to say contact page.
Creating our routes
Now that we have created our base page components, we need to create a navigation bar so our users can click around the site. Create a folder called components and inside, create another component in a folder called. Nav .
import { Link, Outlet } from "react-router-dom";

function Nav() {
  /* Here we are creating a simple navigation element on the home page.  */
  return (
    <div>
      <nav>
        <ul>
          <li>
            <Link to="/">All Jeans</Link>
          </li>
          <li>
            {/* You should still use the `<a></a>` HTML tag when linking to something outside the app. However, now, when linking to other pages or content inside the app, we use the React Router `Link` component. */}
            <Link to="/bootcut">Bootcut Jeans</Link>
          </li>
          <li>
            {/* To tell the link where to navigate, we add the URL to the to prop.  */}
            <Link to="/skinny">Skinny Jeans</Link>
          </li>
          <li>
            <Link to="contact">Contact Us</Link>
          </li>
        </ul>
      </nav>
      {/* The Outlet component is where the content of the page will be rendered. */}
      <Outlet />
    </div>
  );
}

export default Nav;
Now it is time to head to our main.jsx file and create our routes. You can delete the app.jsx and app.css file as it will not be needed. I left some comments to explain what I am doing, but you can delete those.
import React from "react";
import ReactDOM from "react-dom/client";
import { createBrowserRouter, RouterProvider } from "react-router-dom";

// Components
import Nav from "./components/Nav";
import HomePage from "./pages/HomePage";
import JeansPage from "./pages/JeansPage";
import ContactPage from "./pages/ContactPage";

// CSS
import "./index.css";

const router = createBrowserRouter([
  {
    path: "/",
    /* Here we are setting the Nav as the default element to load when the app starts. */
    element: <Nav />,
    /** Adding the page components to the children array mean they render inside the Outlet component we added in the nav */
    children: [
      {
        path: "/",
        // Here we are creating our home page route. We set the path to "/" as it is the starting page in our app, and we pass in the component we want to load to the element prop.
        element: <HomePage />,
      },
      {
        // Setting the path ":jeans" means it is a dynamic path param. It is a parameter that is changed based on something happening in the app. Any URL that does not match "/" or "/contact" and has something after the base URL will cause the element in this route to load. Don't worry if you are not 100% sure what this means; you will see it in action later.
        path: ":jeans",
        element: <JeansPage />,
      },
      {
        // Setting the path to "contact" will load the contact page component at the URL /contact.
        path: "/contact",
        element: <ContactPage />,
      },
    ],
  },
]);

ReactDOM.createRoot(document.getElementById("root")).render(
  <React.StrictMode>
    <RouterProvider router={router} />
  </React.StrictMode>
);
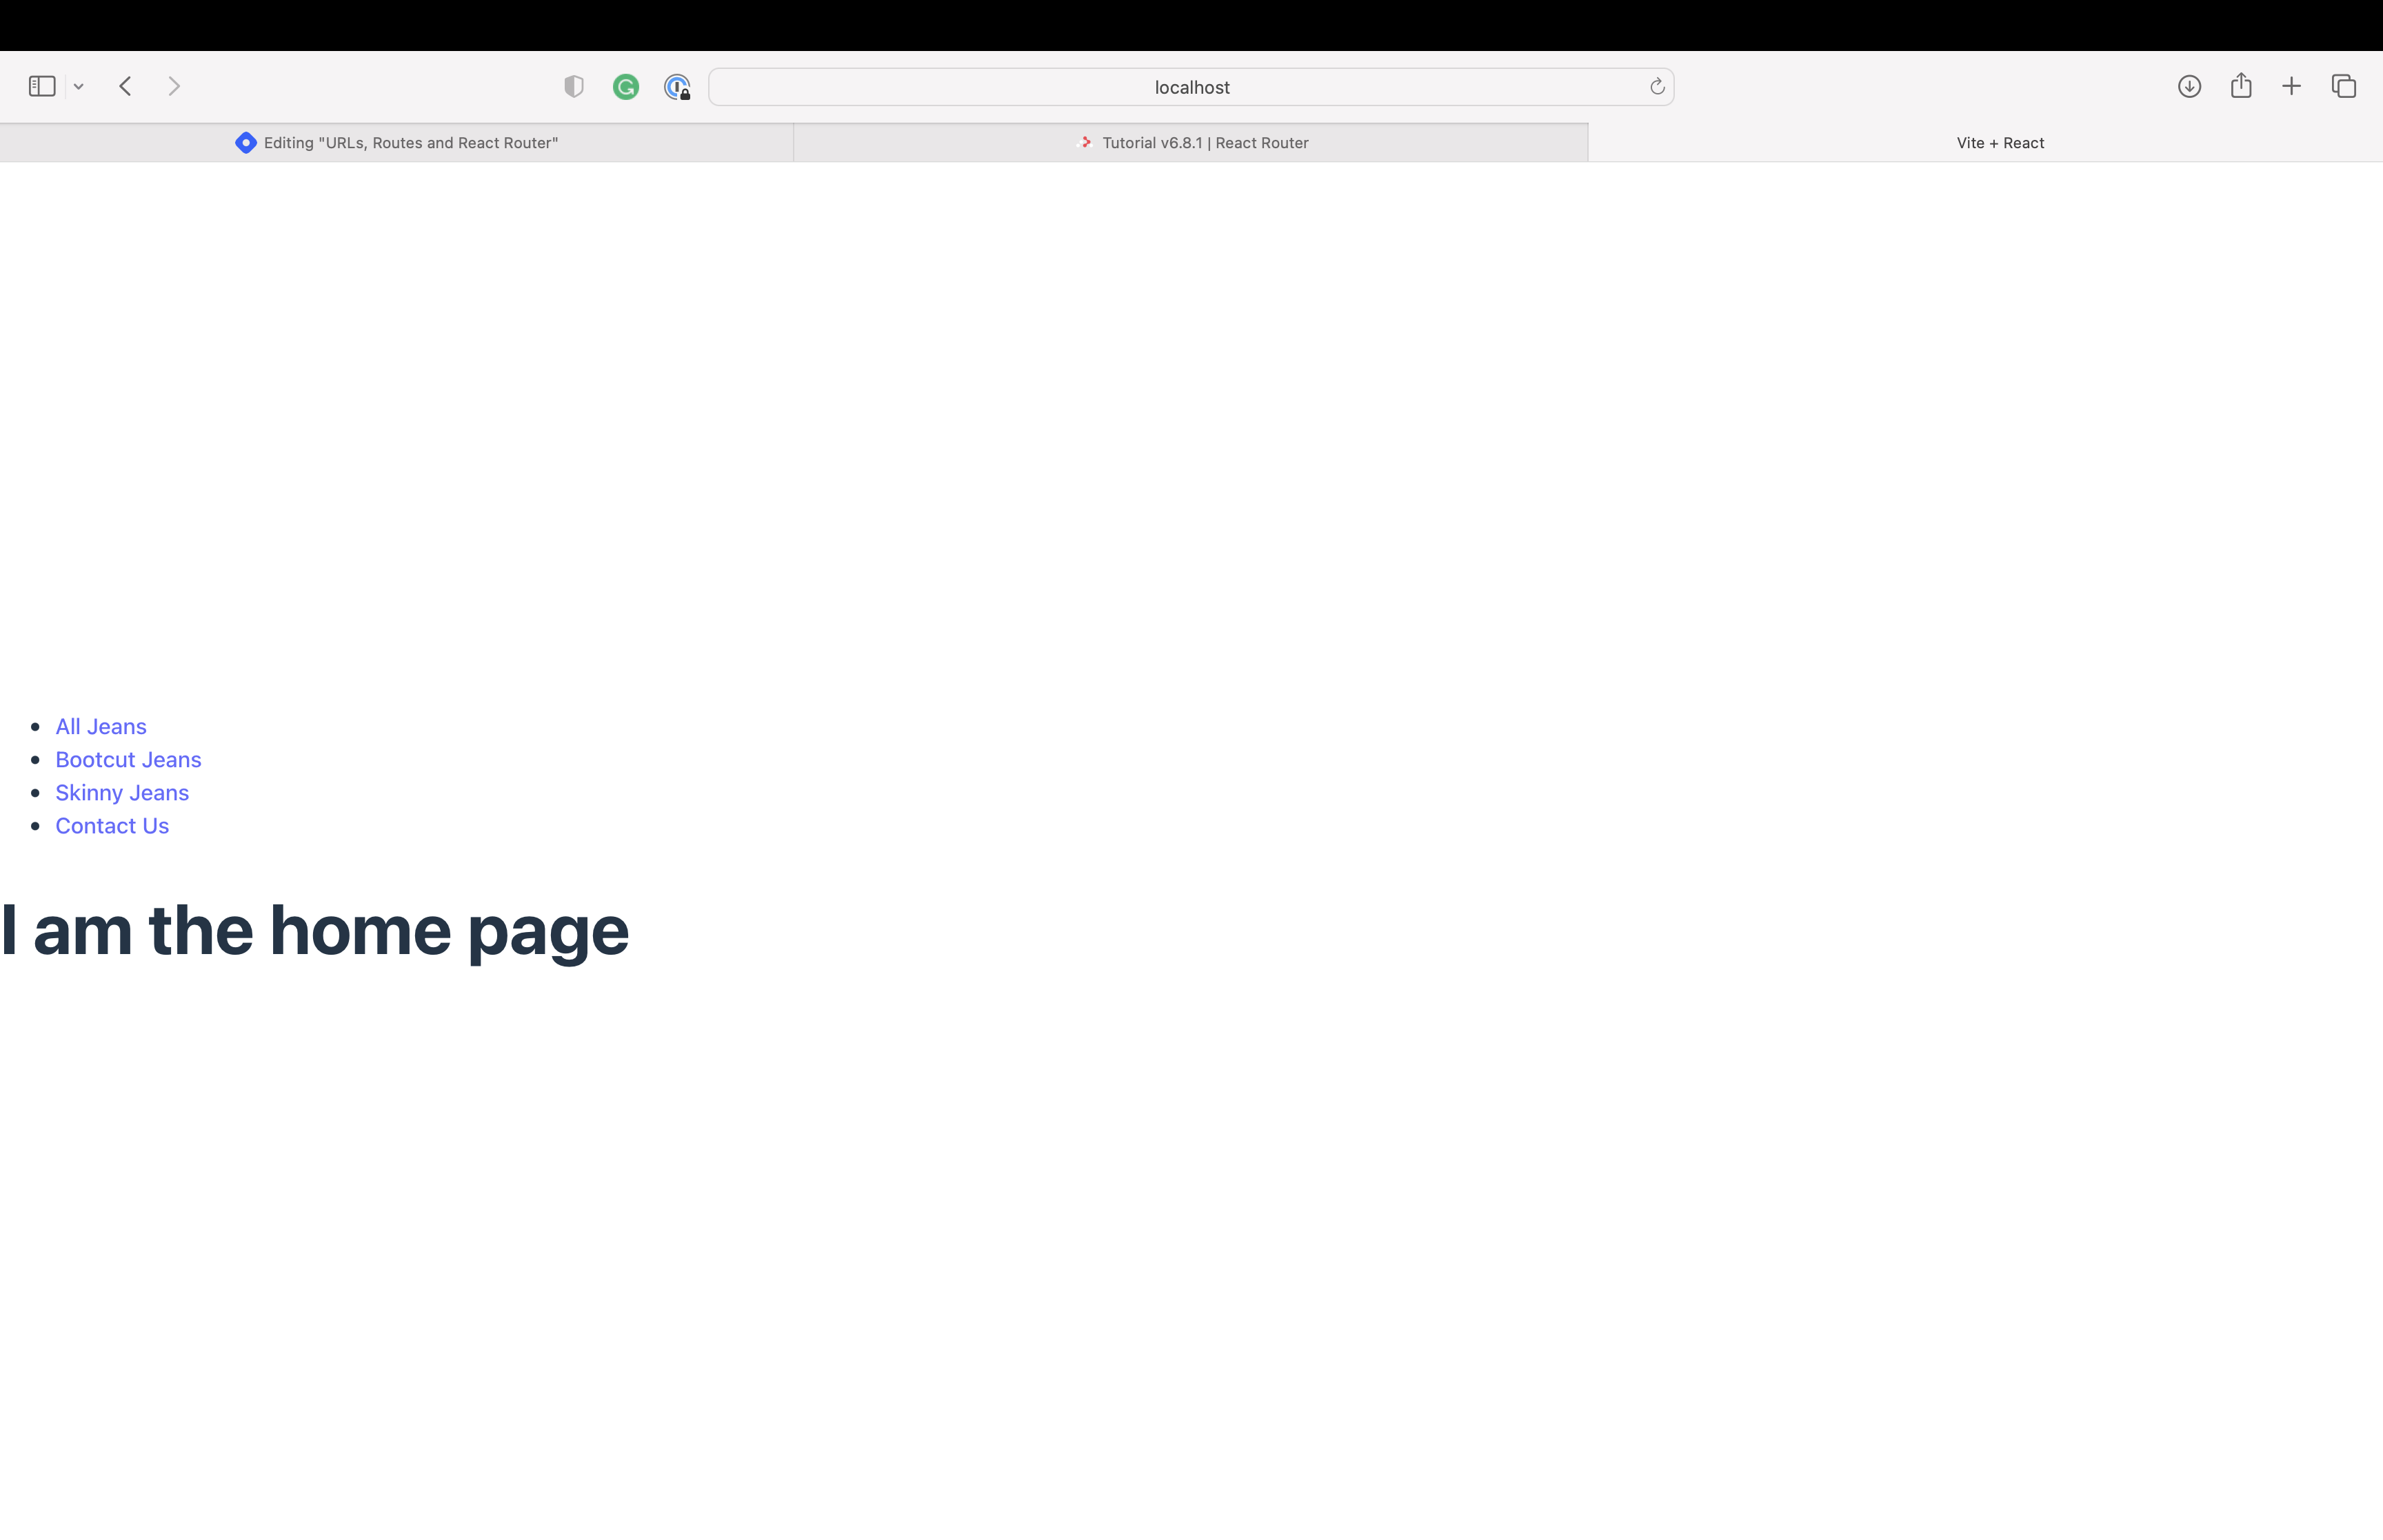
Head to your app in the browser, and you will see the following on the home page at the base URL http://localhost:5173
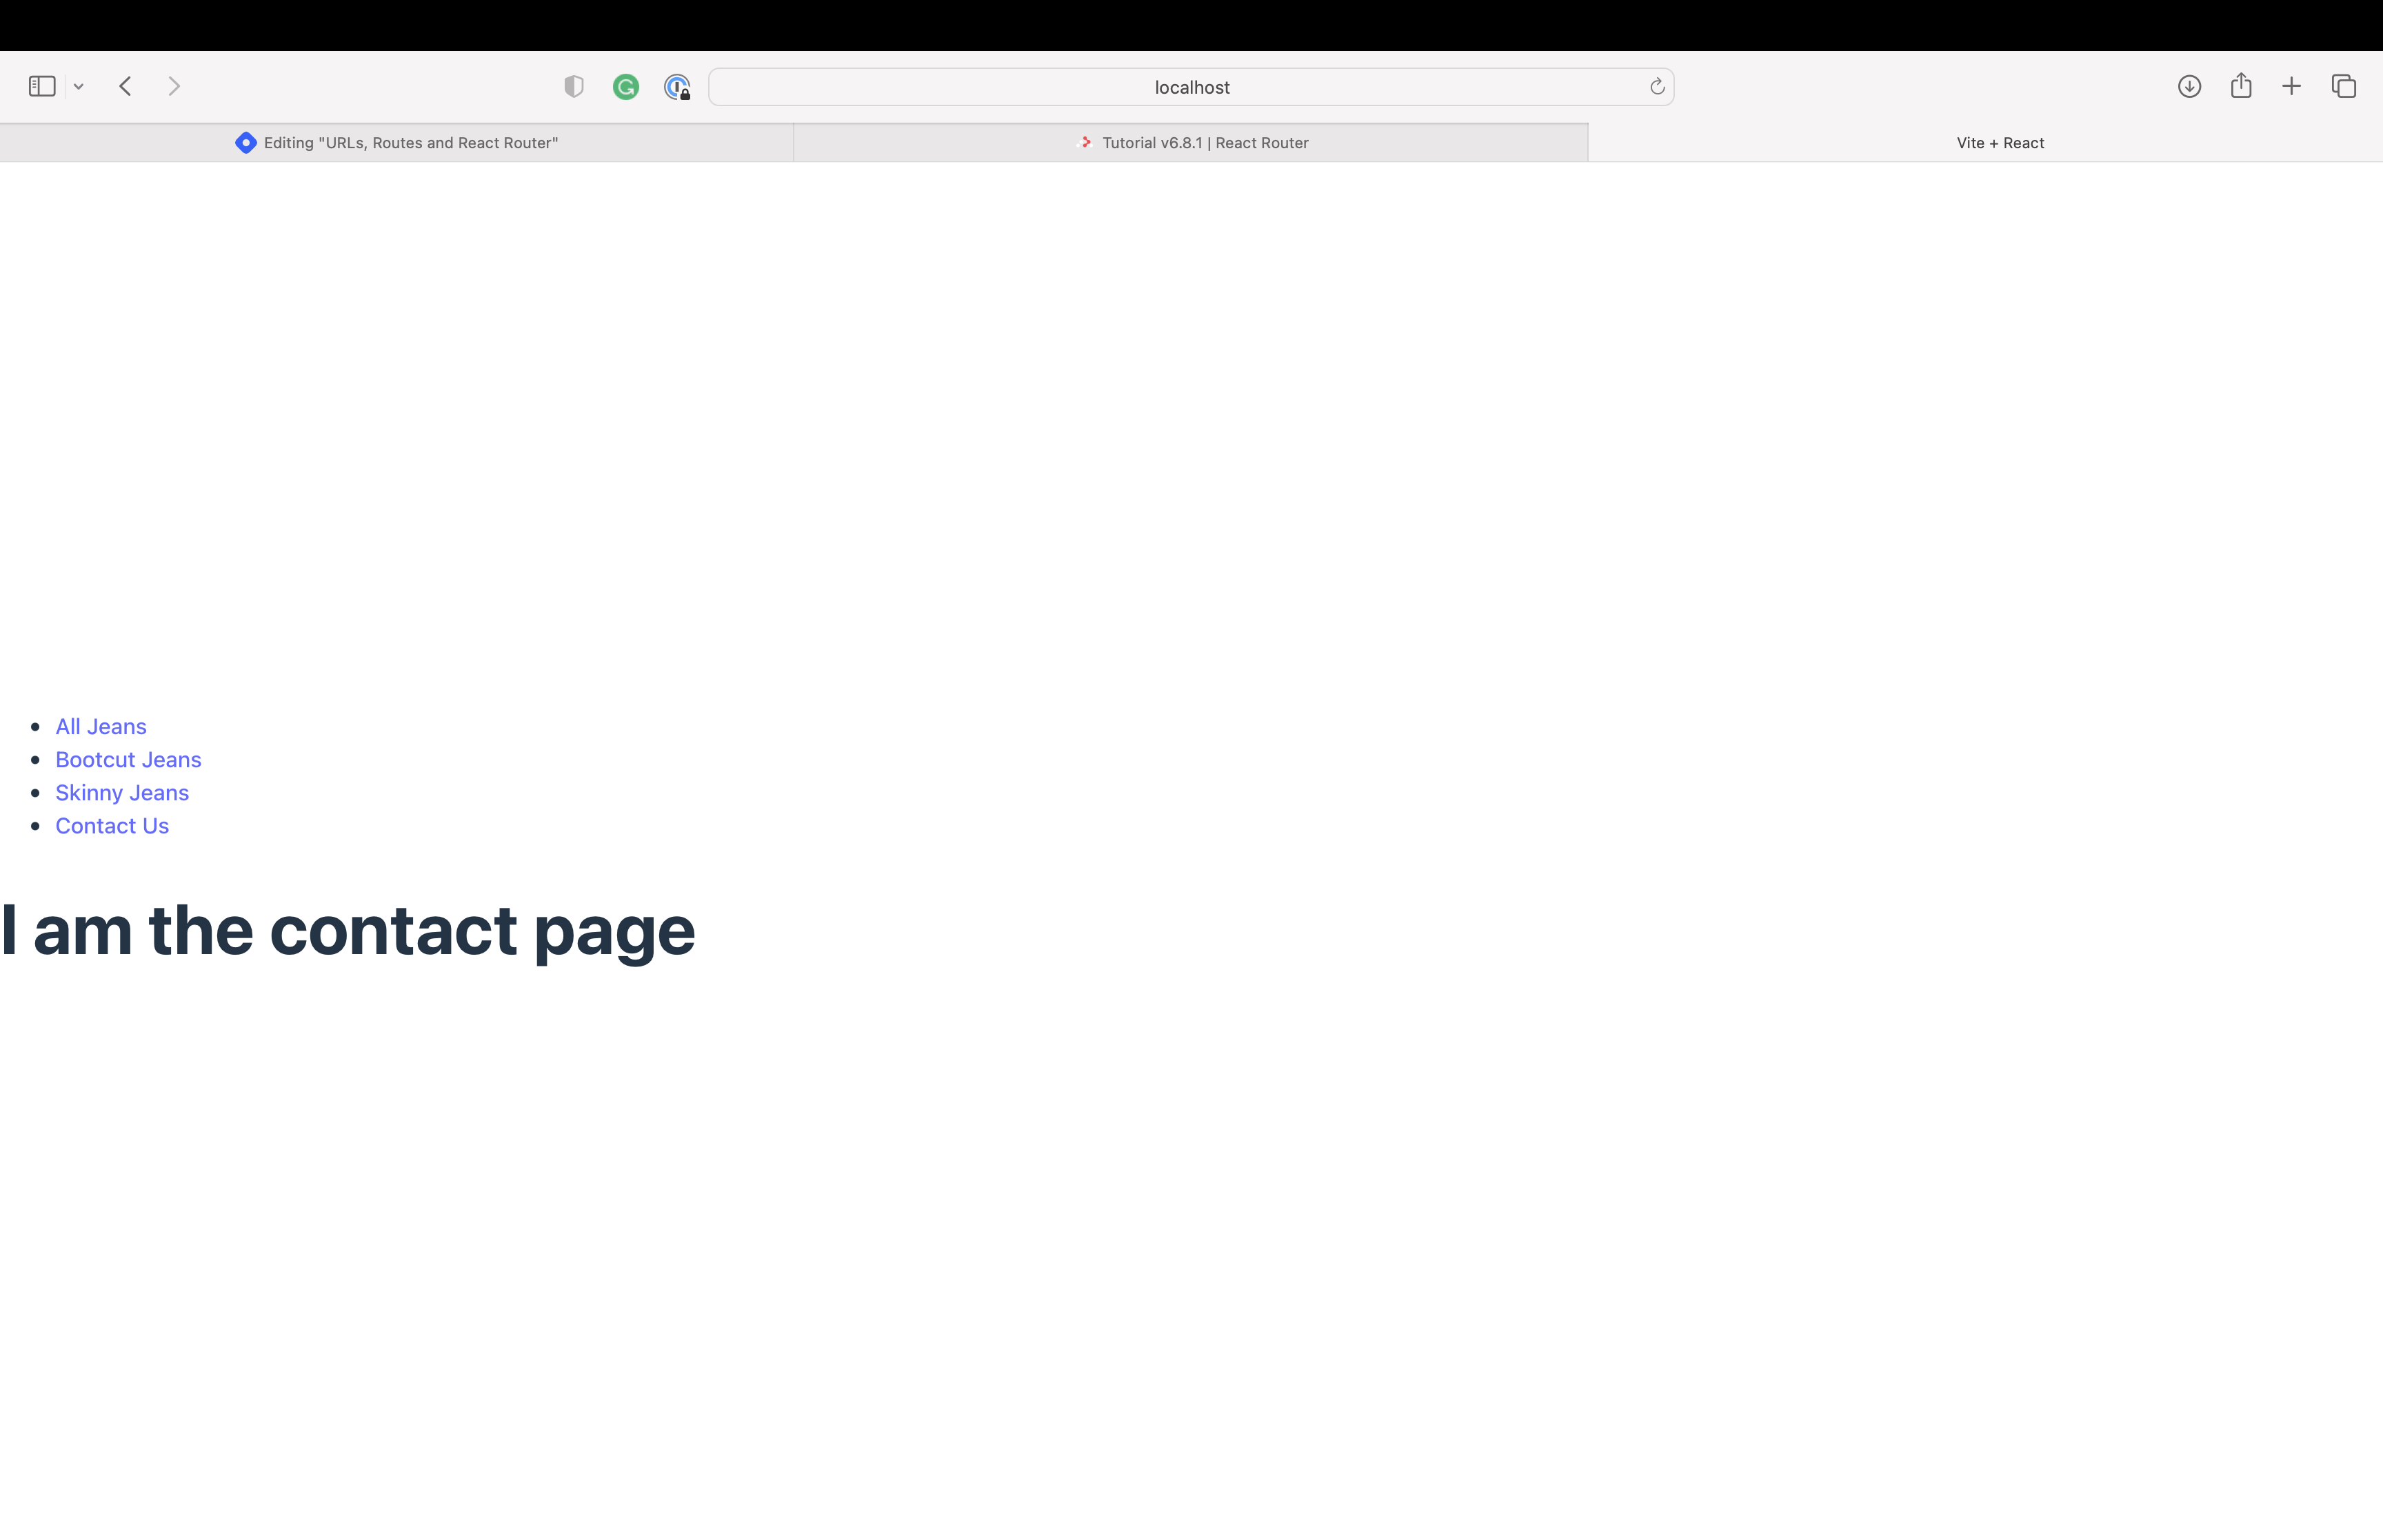
Click the contact page link, and the URL should change to http://localhost:5173/contact, and the page should reload and show you the contact page.
Click back in the browser, and you should be on the home page. If this has not happened for you, double-check your added code. I have also included a link to the example app on Github at the end of the blog.
Path params
Head to the JeansPage component and add a new function that allows us to access the path parameter.
import React from "react";
import { useParams } from "react-router-dom";

function JeansPage() {
  /**
   * useParams is a hook (function) that allows us to access the path param. Earlier, when we set the path of the route component that loads the jeans page, we added the path param `: jeans` into the URL.
   * We can access whatever value is put in this URL section using useParams and then access the value using the same key, `jeans`.
   */
  const params = useParams();

  return (
    <div>
      <h2>{params.jeans}</h2>
    </div>
  );
}

export default JeansPage;
We're now injecting the path parameter into the <h1></h1> element. You should see it updated on the page when the path parameter changes. Head back to the home page and click Bootcut Jeans. You should see the following:
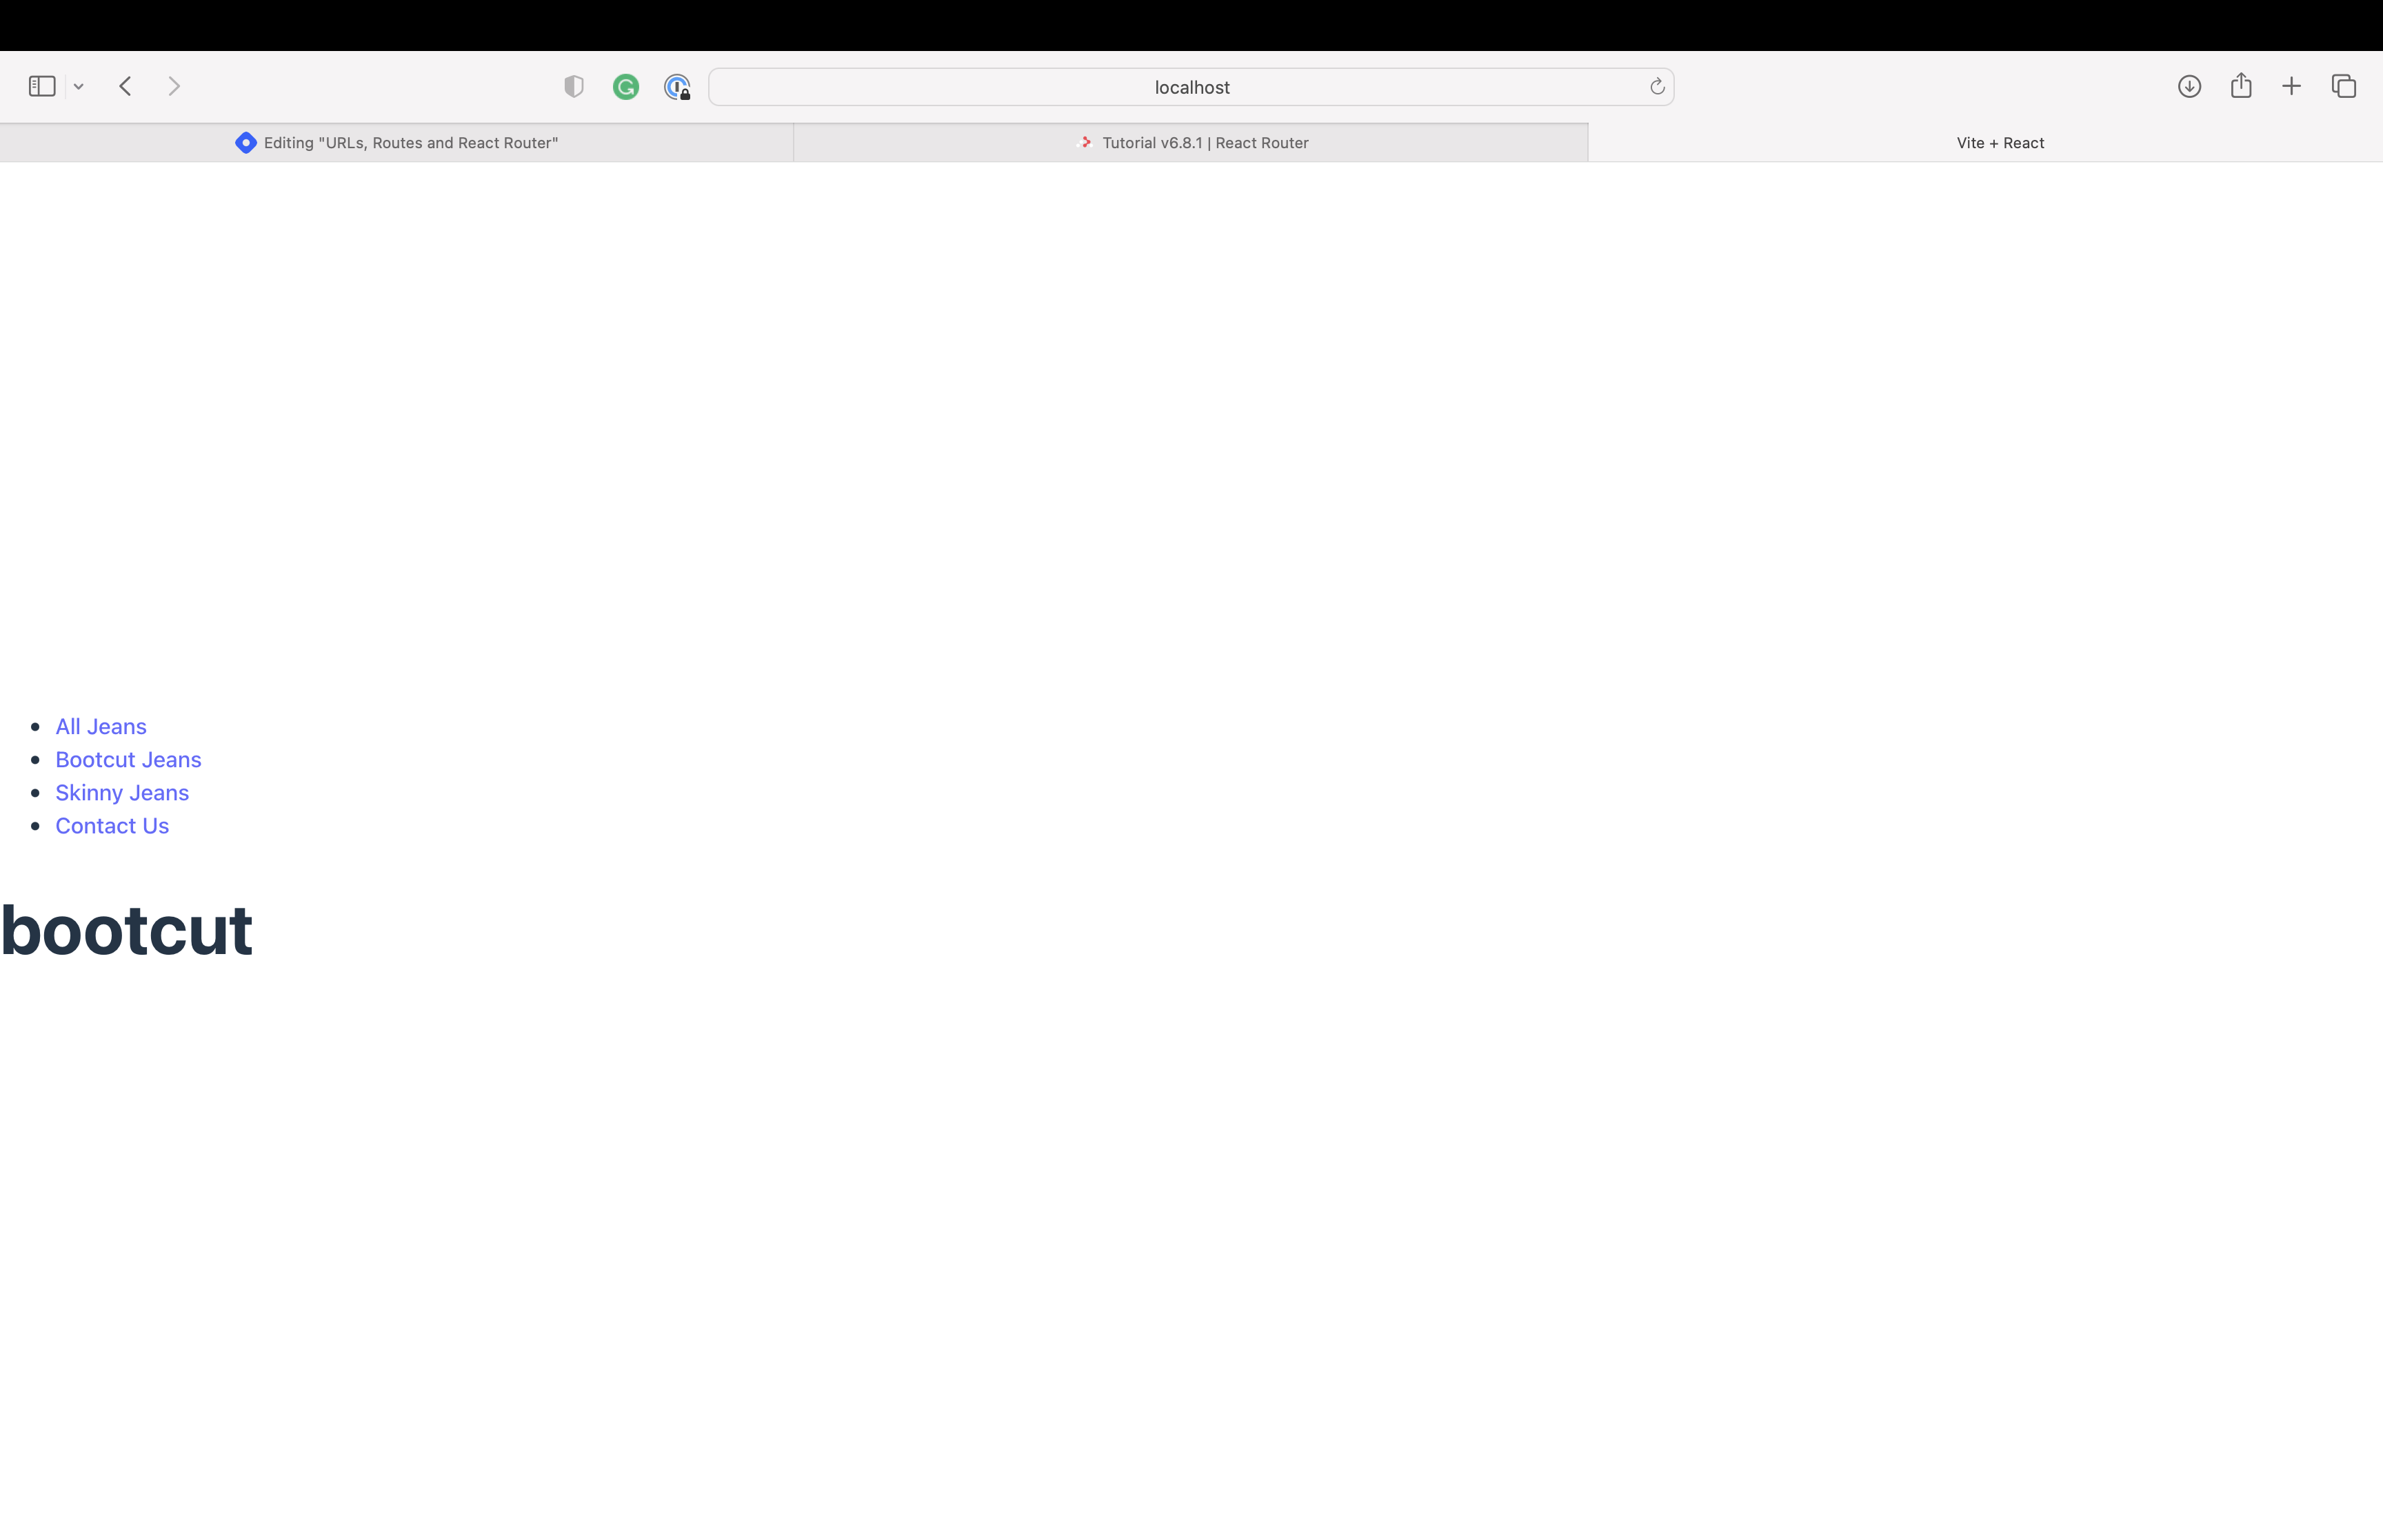
Your URL should also contain bootcut http://localhost:5173/bootcut. Click back and press the Skinny Jeans link. The title on the page should change to skinny, and the URL matches skinny too. Here you can see path params at work.
Conclusion
If you want to check out my example project, you can find all the code here on Github. For further reading on React Router, they have excellent docs and examples; check out their introduction section.
If you have any questions about what I have covered or spot a mistake, you can reach me here or on Twitter.